by Eduardo Rodrigues
Ok, I know JDeveloper 10g already comes with an embedded JAXB compiler which can be found in menu "Tools -> JAXB Compilation...". The only problem with this compiler is that it's a JAXB 1.0 implementation and, believe me, the differences are simply HUGE when compared to it's successor, JAXB 2.0. And all for the very best. To prove my point, let's go through a simple example comparing both JAXB versions.
First of all, let's create a new application in JDeveloper with one empty project called "JAXB 1.0" adding only "XML" to its technology scope:
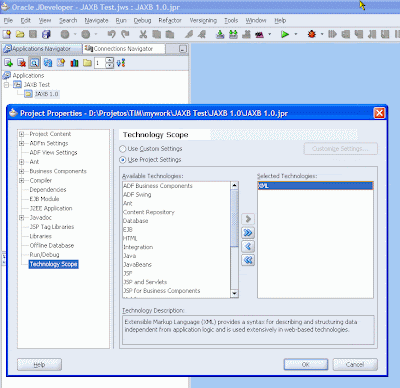
We must have a valid DTD or XML Schema so the JAXB compiler can work. Let's consider this small and simple XML Schema borrowed from a
W3C tutorial:
<?xml version="1.0" encoding="ISO-8859-1" ?>
<xs:schema xmlns:xs="http://www.w3.org/2001/XMLSchema">

<!-- definition of simple elements -->
<xs:element name="orderperson" type="xs:string"/>
<xs:element name="name" type="xs:string"/>
<xs:element name="address" type="xs:string"/>
<xs:element name="city" type="xs:string"/>
<xs:element name="country" type="xs:string"/>
<xs:element name="title" type="xs:string"/>
<xs:element name="note" type="xs:string"/>
<xs:element name="quantity" type="xs:positiveInteger"/>
<xs:element name="price" type="xs:decimal"/>

<!-- definition of attributes -->
<xs:attribute name="orderid" type="xs:string"/>

<!-- definition of complex elements -->
<xs:element name="shipto">
 <xs:complexType>
  <xs:sequence>
   <xs:element ref="name"/>
   <xs:element ref="address"/>
   <xs:element ref="city"/>
   <xs:element ref="country"/>
  </xs:sequence>
 </xs:complexType>
</xs:element>
<xs:element name="item">
 <xs:complexType>
  <xs:sequence>
   <xs:element ref="title"/>
   <xs:element ref="note" minOccurs="0"/>
   <xs:element ref="quantity"/>
   <xs:element ref="price"/>
  </xs:sequence>
 </xs:complexType>
</xs:element>

<xs:element name="shiporder">
 <xs:complexType>
  <xs:sequence>
   <xs:element ref="orderperson"/>
   <xs:element ref="shipto"/>
   <xs:element ref="item" maxOccurs="unbounded"/>
  </xs:sequence>
  <xs:attribute ref="orderid" use="required"/>
 </xs:complexType>
</xs:element>
</xs:schema>
Just copy the code above to a file named
"shiporder.xsd" in the project's root directory so it will automatically show in project's "Resources" folder:
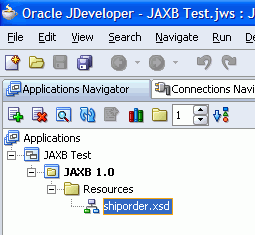
Now select file "shiporder.xsd" in the application navigator, click the menu item "Tools -> JAXB Compilation..." and fill up the pop-up shown as the screenshot bellow:
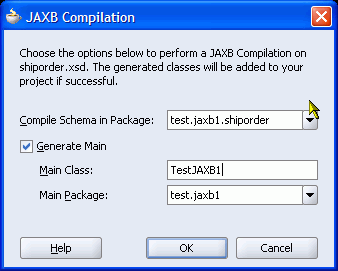
After pressing the "OK" button, you should see the following scenario:
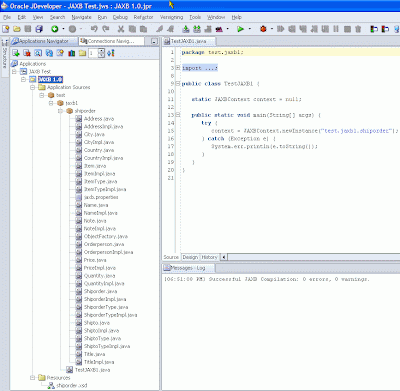
As you can see, the JAXB compiler generates a bunch of classes and interfaces reflecting the structure defined by the compiled XML Schema. If you look closer, you'll notice that some of the classes extend
"oracle.xml.jaxb.JaxbNode" (like class
ShiporderTypeImpl, for instance). That's because the built-in JAXB compilation feature we just showed relies on a JAXB 1.0 proprietary implementation provided by Oracle in its XML Developer Kit which comes with JDeveloper. You may get more details on this at
Oracle XDK Home site.
Continuing with our test case, let's create a sample "testorder.xml" based on our shiporder.xsd schema:
<?xml version="1.0" encoding="ISO-8859-1" ?>
<shiporder orderid="0001" xmlns:xsi="http://www.w3.org/2001/XMLSchema-instance"
xsi:noNamespaceSchemaLocation="shiporder.xsd">
<orderperson>Eduardo Rodrigues</orderperson>
<shipto>
<name>John Doe</name>
<address>#100, Oracle Parkway</address>
<city>Redwood City</city>
<country>USA</country>
</shipto>
<item>
<title>DVD+RW</title>
<quantity>50</quantity>
<price>.50</price>
</item>
<item>
<title>17" LCD Monitor</title>
<quantity>5</quantity>
<price>150.00</price>
</item>
<item>
<title>Bluetooth Mouse</title>
<quantity>10</quantity>
<price>40.00</price>
</item>
</shiporder>To read in and process this sample XML using the package generated by Oracle's JAXB compiler, we must use the JAXB feature called
"Unmarshal". To do that, I'll modify class
test.jaxb1.TestJAXB1 like this:
package test.jaxb1;

import java.io.File;
import java.util.List;
import javax.xml.bind.JAXBContext;
import javax.xml.bind.JAXBException;
import javax.xml.bind.Marshaller;
import javax.xml.bind.Unmarshaller;
import test.jaxb1.shiporder.*;

public class TestJAXB1 {

   static JAXBContext context = null;

   public static void main(String[] args) {
      try {
         context = JAXBContext.newInstance("test.jaxb1.shiporder");
         Unmarshaller unmarshaller = context.createUnmarshaller();
         Shiporder order = (Shiporder)unmarshaller.unmarshal(new File("testorder.xml"));
         System.out.println("Items included in order #"+order.getOrderid()+" are:");

         for (ItemTypeImpl item : (List<ItemTypeImpl>)order.getItem()) {
            System.out.println("\t:. "+item.getTitle()+" - "+
               item.getQuantity()+" item(s) at $"+item.getPrice()+" each");
         }
      } catch (Exception e) {
         e.printStackTrace();
      }
   }
}
Making a long story short, the "magic" performed by the
Unmarshaller is basically to parse the XML using the classes generated by the JAXB compiler to map its entire content into memory. It's just like using a DOM parser to load the XML's DOM tree into memory. The advantage here is that the names, attributes and methods in JAXB generated objects strictly reflect the XML's structure defined by its schema making it much easier and more intuitive to work with them instead of a pure DOM tree. Running the test above, the outcome should be:
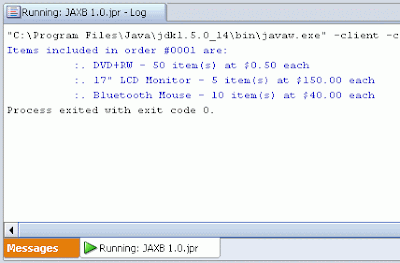
Quite easy. You'd probably think: Well... I'm ok with that. It's easy enough already. The question is: is that so???
NOT!!!Now I will repeat the same test case described above only upgrading from JAXB 1.0 to
JAXB 2.0. First, we'll need to get a working implementation of JAXB 2.0. I recommend Sun's reference implementation which can be downloaded
here (at the time I was writing this post, version 2.1.6 was the latest one). Just follow the instructions in that page to install it correctly and notice the
bin subdirectory containing some scripts, including
"xjc.bat" (for Windows; "xjc.sh" for Unix). This is the script supplied to execute JAXB 2.0 compilation. The trick here is to embed it in JDeveloper as an
"External Tool". I'll show you how to do that step-by-step:
- Click the menu item "Tools -> External Tools..."
- Press the "New..." button to start the "Create External Tool" wizard
- Select "External Program" as the "Tool Type" and press "Next"
- Fill the 3 displayed fields as follows:
- Program Executable:
full path to the script "xjc.bat" which sould be <Sun_JAXB_2.1.6_install_dir>/bin/xjc.bat (or "xjc.sh" on Unix)
- Arguments:
-d "${project.first.sourcepath}" -p ${promptl:label=Target Package Name} "${file.path}".
Press button "Insert..." to see all macros available (i.e.: ${file.path}).
The arguments above will be passed to the script "xjc.bat". Execute it with no arguments in a command prompt to see a help on all possible arguments. The default is to compile a XML Schema but you can use -dtd to compile a DTD instead, although it's an experimental feature.
- Run Directory:
<Sun_JAXB_2.1.6_install_dir>/bin
- Press "Next" to advance to "Display" step and fill the 3 fields as you like. I suggest the following:
- Caption for Menu Items:
Compile XML Schema with JAXB 2.0
- ToolTip Text:
Compile a XML Schema with JAXB 2.0 Reference Implementation by Sun Microsystems
- ToolTip Text:
ide.fileicon:<SUN_JAXB_2.1.6_install_dir>/bin/xjc.bat
- Press "Next" to advance to "Integration" step where I recommend selecting "Tools Menu" and "Navigator Context Menu"
- Press "Next" to advance to the final step "Availability". Here, I recommend choosing the option "When Specific File Types are Selected" and then move only the item "XML Schema Type" from list "Available Types" to list "Selected Types"
- Press "Finish" and done!
Now we have the same built-in "JAXB Compilation" functionality described before but now using Sun's JAXB 2.1.6. So, let's repeat the same test case using our new tool.
First, create a new empty project called
"JAXB 2.0" also adding only "XML" to its technology scope.
We'll need to create a JAXB 2.0 library and add it to the project:
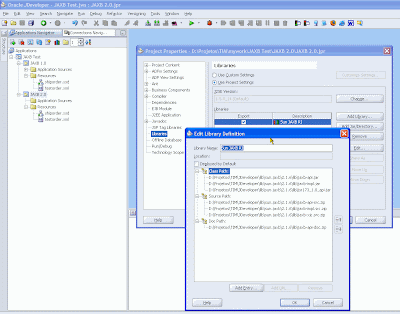
The important here is to add the following archives, located in directory <Sun_JAXB_2.0_install_dir>/lib, to the library's class path:
jaxb-api.jar,
jaxb-impl.jar and
jsr173_1.0_api.jar.
Now just copy files
"shiporder.xsd" and
"testorder.xml" from project "JAXB 1.0" to this new project's root directory.
Also be sure that the sources directory configured for the project exists and, if it doesn't, create it manually. That's needed because Sun's JAXB 2.1.6 compiler won't create its output directory automatically and the process will fail if that directory doesn't exist. Finally, select file "shiporder.xsd" in the Applications Navigator and execute our newly created menu item
"Tools -> Compile XML Schema with JAXB 2.0"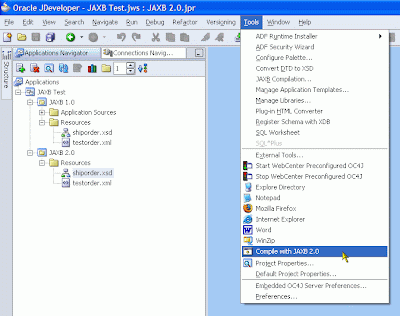
Define
"test.jaxb2.shiporder" as the "Target Package Name" when prompted. After execution, you should see the following output:
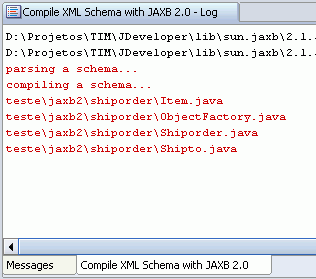
Just click the
"Refresh" button on the Applications Navigator and the new package "test.jaxb2.shiporder" will appear. At this point we can already make a simple comparison:
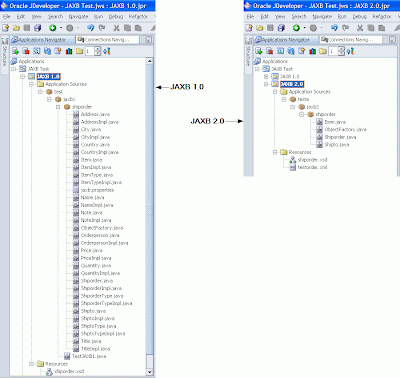
As you can see, instead of generating 16 interfaces, 15 classes and 1 property file, JAXB 2.0 generated only 4 classes! And like it was not enough, if you look inside those 4 classes you'll notice that they are all very simple
POJOs!!!
Take class "Shiporder.java" for example:
//
// This file was generated by the JavaTM Architecture for XML Binding(JAXB) Reference Implementation, v2.1.5-b01-fcs
// See <a href="http://java.sun.com/xml/jaxb">http://java.sun.com/xml/jaxb</a>
// Any modifications to this file will be lost upon recompilation of the source schema.
// Generated on: 2008.01.09 at 12:41:26 PM BRST
//
package test.jaxb2.shiporder;
import java.util.ArrayList;
import java.util.List;
import javax.xml.bind.annotation.XmlAccessType;
import javax.xml.bind.annotation.XmlAccessorType;
import javax.xml.bind.annotation.XmlAttribute;
import javax.xml.bind.annotation.XmlElement;
import javax.xml.bind.annotation.XmlRootElement;
import javax.xml.bind.annotation.XmlType;
/**
* <p>Java class for anonymous complex type.
*
* <p>The following schema fragment specifies the expected content contained within this class.
*
* <pre>
* <complexType>
* <complexContent>
* <restriction base="{http://www.w3.org/2001/XMLSchema}anyType">
* <sequence>
* <element ref="{}orderperson"/>
* <element ref="{}shipto"/>
* <element ref="{}item" maxOccurs="unbounded"/>
* </sequence>
* <attribute ref="{}orderid use="required""/>
* </restriction>
* </complexContent>
* </complexType>
* </pre>
*
*
*/
@XmlAccessorType(XmlAccessType.FIELD)
@XmlType(name = "", propOrder = {
"orderperson",
"shipto",
"item"
})
@XmlRootElement(name = "shiporder")
public class Shiporder {
@XmlElement(required = true)
protected String orderperson;
@XmlElement(required = true)
protected Shipto shipto;
@XmlElement(required = true)
protected List<Item> item;
@XmlAttribute(required = true)
protected String orderid;
/**
* Gets the value of the orderperson property.
*
* @return
* possible object is
* {@link String }
*
*/
public String getOrderperson() {
return orderperson;
}
/**
* Sets the value of the orderperson property.
*
* @param value
* allowed object is
* {@link String }
*
*/
public void setOrderperson(String value) {
this.orderperson = value;
}
/**
* Gets the value of the shipto property.
*
* @return
* possible object is
* {@link Shipto }
*
*/
public Shipto getShipto() {
return shipto;
}
/**
* Sets the value of the shipto property.
*
* @param value
* allowed object is
* {@link Shipto }
*
*/
public void setShipto(Shipto value) {
this.shipto = value;
}
/**
* Gets the value of the item property.
*
* <p>
* This accessor method returns a reference to the live list,
* not a snapshot. Therefore any modification you make to the
* returned list will be present inside the JAXB object.
* This is why there is not a <CODE>set</CODE> method for the item property.
*
* <p>
* For example, to add a new item, do as follows:
* <pre>
* getItem().add(newItem);
* </pre>
*
*
* <p>
* Objects of the following type(s) are allowed in the list
* {@link Item }
*
*
*/
public List<Item> getItem() {
if (item == null) {
item = new ArrayList<Item>();
}
return this.item;
}
/**
* Gets the value of the orderid property.
*
* @return
* possible object is
* {@link String }
*
*/
public String getOrderid() {
return orderid;
}
/**
* Sets the value of the orderid property.
*
* @param value
* allowed object is
* {@link String }
*
*/
public void setOrderid(String value) {
this.orderid = value;
}
}"public class Shiporder {". No interfaces being implemented, no classes being extended at all. Only a simple JavaBean with its attributes and their respective accessors. The "magic" here is done thanks to the annotations. They perform the actual mapping between the XML's structure defined by the compiled XML Schema and the classes derived from that compilation process.
I think it's pretty obvious to see the huge advantages of JAXB 2.0 when compared to version 1.0. The compilation of a XML Schema produces much fewer classes and those classes are simply annotated POJOs. This certainly implies a much
faster,
lighter and
easier to understand XML binding.
Besides, there are some other details that makes JAXB 2.0 even more beneficial. Javadocs are automatically generated, it relies on cutting-edge XML parsing technology called
"Streaming API for XML" which basically gives much more precise control over XML document processing. For further info on this, read "
Oracle StAX Pull Parser Preview" and "
JSR#173 homepage". Finally, as opposed to the
known limitations of JDeveloper's built-in JAXB 1.0 compiler, Sun's JAXB 2.1.6 supports:
- Javadoc generation
- The key and keyref features of XML Schema
- The List and Union features of XML Schema
- SimpleType mapping to TypeSafe Enum class and IsSet property modifier
- XML Schema component "any" and substitution groups
- Customization of XML Schema to override the default binding of XML Schema components
- On-demand validation of content based on a given Schema
To run the same unmarshalling test, just create class "
test.jaxb2.TestJAXB2" as follows:
package test.jaxb2;

import java.io.File;
import javax.xml.bind.JAXBContext;
import javax.xml.bind.Unmarshaller;
import test.jaxb2.shiporder.Item;
import test.jaxb2.shiporder.Shiporder;

public class TestJAXB2 {

   public static void main(String[] args) {
      try {
         JAXBContext context = JAXBContext.newInstance("test.jaxb2.shiporder");
         Unmarshaller unmarshaller = context.createUnmarshaller();
         Shiporder order = (Shiporder)unmarshaller.unmarshal(new File("testorder.xml"));
         System.out.println("Items included in order #"+order.getOrderid()+" are:");

         for (Item item : order.getItem()) {
            System.out.println("\t:. "+item.getTitle()+" - "+
               item.getQuantity()+" item(s) at $"+item.getPrice()+" each");
         }
      } catch (Exception e) {
         e.printStackTrace();
      }
   }
}
This is slightly different from class "
test.jaxb1.TestJAXB1" but, after running it, you should see exactly the same outcome:
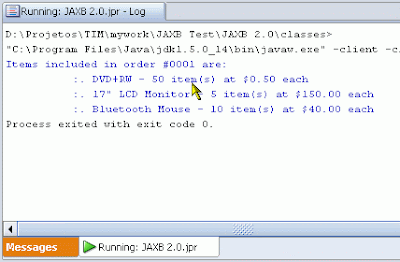
Well, that's it. I think I've made my point. So good luck in your JAXB 2.0 adventures!
 Switch to new Dynamic Views


