Showing posts with label jdeveloper. Show all posts

Saturday, July 17, 2010

JDeveloper Overview and (book) Review

Dear visitors,
I will pretend I forgot that I'm about a year without posting anything and I will go straight to the subject that I owe to you: The review of the book "Processing XML documents with Oracle JDeveloper 11g". Before start I would like to make an introduction to JDeveloper.

About JDeveloper

Introduction

JDeveloper is the Oracle's Strategic IDE. Besides being used to develop Oracle's products it is a tool that has the goal to support all Oracle's technological stack, and also the majority of Java EE patterns and derivables. For example: you can draw a BPEL flow that orchestrates several services available in Oracle Service Bus, develop WSRP portlets that will be consumed by your Oracle Portal, implement EJBs that can be easily published like Web Services, or even build an portal that follows the E2.0 trend with Webcenter ADF components.

Main features

• Integrated enterprise development environment
• Visual and declarative editors
• Complete development lifecycle coverage
• Built-in development framework
• Advanced features for Java, Database, Web services, SOA, and Web development

Being a developer, I cannot forget to mention the powerful Oracle ADF (Application Development Framework). I will not cover details but worth it is saying that part of the framework is considered a model JSF implementation -- by the way, it was donated to the Apache Foundation -- and it has a powerful abstraction of the model layer (JSR-227) that, with the JDev's drag-and-drop-declarative interface, makes the development of lowly coupled and highly cohesive applications much simpler and more productive.

JDeveloper and Netbeans

Both IDEs are very important and their development will not stop. While support for Oracle's stack will be implemented mostly in JDev, NetBeans will continue to provide a powerful open source IDE.

License:

JDeveloper is a free tool, you don't have to purchase it. Besides, there is a runtime license required for any production application if you choose to use Oracle TopLink or the Oracle ADF. This license is already included in all editions of the WebLogic Server. Nevertheless you can use JDev for development/evaluation. There is no special license for academic/open source use, but in many cases the "Free OTN License Agreement" (check it out) for JDeveloper will cover this type of usage.

This is the information that I've found in Oracle's website (see the links at the end of the article). Remember: "license things" can and do change. Always check them first before using the product.

Curiosities

For those who are willing to know something about the JDev’s origins.

Processing XML documents with Oracle JDeveloper 11g – The Book

Introduction

In my opinion, JDeveloper 11g shows that it has reached a very good maturity with regard to dealing with XML. The idea of this book is to show us several easy-to-use out-of-the-box JDev’s features while, at the same time, it exposes fundamental concepts about XML processing.

Some concepts about XML presented by the book:

  • DOM Parser
  • SAX Parser
  • Validation with XSD
  • XML navigation using XPath
  • XML transformation using XSLT

Some JDev's features that are also presented by the book:

  • XML Edition(by code and also by its own structure)
  • Creation of XSD using drag and drop
  • Wizard to generate XMLs using XSDs
  • Automatic XML validation (using XSD)

The book has 11 chapters and each of those has a well defined scope and they can be read independently (you don't need to follow any particular order). Generally each chapter introduces a different technology with the following order: an overview, discussion about the main features and the demonstration of a practical example. The examples are very simple and made with dozens of print-screens and source codes. Although it has about 370 pages, the big part of them are used to explain these examples, what turns the book more practical than theoretical.

Public

In my vision, the book targets to two types of public:
1 - Advanced Developers: the book can introduce technologies and may be used as a quick reference guide.
2 - Novice Developers: the book introduces fundamental concepts/tools, showing them in a practical way.

What caught my attention

The book talks about several recent technologies that are in evidence. There are chapters about DOM 3.0 LS, XSL-FO, XML conversions, and also Oracle Berkley DB. For each approach concerning XML processing, the author always uses the Oracle’s Implementation (Oracle XDK). This is very interesting because it shows us features that you don’t have when using the default interfaces.

What I missed the most

There are no details about performance or even about how to choose the right technology for the right problem. And... there is no mention of StAX.
Another point to mention is that the book doesn’t talk about the tight-coupling disadvantages that exist when the Oracle XDK implementation is used instead of the default interfaces.

Chapters overview

Chapter 1: Creating and Parsing an XML Document

  • Introduction to SAX and DOM

Chapter 2: Creating an XML Schema

  • Introduction to Schema (XSD)
  • How to create a schema using the IDE and its wizards
  • How to create XML based on a schema

Chapter 3: XML Schema Validation

  • How to programmatically validate a XML document using schema

Chapter 4: XPath

  • How to use the IDE to "query" the XML using XPath
  • How to programmatically "query" the XML using XPath

Chapter 5: Transforming XML with XSLT

  • Introduction to XSLT
  • How to programmatically use XSLT
  • How to use Oracle's XSLT extension function to call Java classes (very interesting, and seems very powerful as well)

Chapter 6: JSTL XML Tag Library

  • Introduction to the JSTL XML tag library
  • How to configure a web project that uses this tag library in JDev
  • Using JSTL to parse and transform a XML document

Chapter 7: Loading and Saving XML with DOM 3.0 LS

  • What is and how to use it
  • Exposes advantages of using it

Chapter 8: Validating an XML Document with DOM 3 Validation

  • Shows the "dynamic validation", a very relevant functionality that is part of DOM 3.0 LS. This is a very important stretch that I took from inside this chapter:

Oracle XDK 11g is the only XML API that implements the DOM Level 3 Validation specification (http://www.w3.org/TR/2003/PR-DOM-Level-3-Val-20031215/); however, some of the DOM 3 Validation features are not implemented by the Oracle XDK 11g API. A test was run by W3C to determine which of the DOM 3 Validation methods are supported by the XDK 11g implementation. You can refer to the results of the DOM3 Validation test (http://www.w3.org/2003/11/26-DOM3-Val-Oracle-Result.html) when developing a DOM 3 Validation application.

Chapter 9: JAXB 2.0

  • Introduction to JAXB 2.0
  • How to use JDev to generate the JAXB classes using a schema
  • Introduction to the marshalling/unmarshalling process and to the JAXB 2.0 annotations

Chapter 10: Comparing XML Documents

  • Overview about tools that can do XML comparison/diff
  • Introduces the Oracle XDK 11g. This tool provides an API to work with comparison/diff and to automate the XSL generation. The second feature is achieved based on the original XML and the XML which we want to transform the original one into. Example: XML1 has X differences comparing to XML2. Using these X differences the API knows how to create an XSL that transforms XML1 into XML2

Chapter 11: Converting XML to PDF

  • Overview of several tools that generate PDF files
  • Short explanation about XSL-FO
  • Demonstration on how to transform a XML into XSL-FO document using XSL
  • How to use the Apache FOP API to transform a XSL-FO document into a PDF file

Chapter 12: Converting XML to MS Excel

  • Overview about several tools to read/write XLS files
  • This chapter is not like the others that introduce some standard patterns and concepts. This one just shows how to use Apache POI-HSSF to work with XLS

Chapter 13: Storing XML in Oracle Berkeley DB XML
This is a very interesting chapter because BDB XML is not a subject that is commonly discussed. It's worth to know the basics because it is an efficient way (and also fast) to store and query XMLs. Main points:

  • Overview about Oracle Berkeley DB XML ("an embeddable XML database for storing and retrieving XML documents").
  • Using BDB XML from command line (basic operations)
  • Using BDB XML with a Java API (basic operations)

Chapter 14: Oracle XML Publisher

  • Overview about Oracle XML Publisher (now it is called Oracle BI Publisher) and its advantages over the Apache FOP/Apache POI (shown on chapters 11 and 12, respectively).
  • How to use Oracle XML Publisher + XSL-FO to generate PDF (and how it is possible to generate different formats as well)
  • How to create and merge XSL-FO docs
  • How to merge PDF docs
  • How to use the "Data Engine API" to create an XML document from database data

Sources:

Processing XML documents with Oracle JDeveloper 11g
JDeveloper
JDeveloper History
JDeveloper FAQ
Oracle Java Tools FAQ

Thursday, April 9, 2009

Our first official book review in on its way...

by Eduardo Rodrigues

Great news!

We have been contacted (surprisingly) by Packt Publishing a few days ago and asked if we would be interested in read one of their new books and then publish an independent review here in the blog. We were very honored and flattered with the offer, so we obviously accepted it.

The book is "Processing XML documents with Oracle JDeveloper 11g" by Deepak Vohra.

One good thing that immediately caught my attention as soon as the book arrived today was seeing the name "Frank Nimphius" in the list of reviewers. This is certainly a good sign :)

Anyway, Fabio and I already have the book and we'll both read it and then compile our comments in a 4-hand post to come. We hope it wont take too long (and also hope this will be just the first of many other book reviews to come).

Cheers and keep reading!

Tuesday, July 8, 2008

There's a cook in JDev's development team indeed

Sometime ago I was surprised with a peculiar "tip of the day" which simply mentioned a traditional angel cake recipe.

Well, today I got the confirmation. There's certainly a cook amongst JDev's developers!

Look at the "tip" showed to me today:


Hmmmm... interesting... :)

Wednesday, May 7, 2008

Windows XP SP3 crashing JDeveloper 10.1.3.3

by Eduardo Rodrigues


Attention!!!


Today, my Windows XP automatically upgraded to SP3 and, after rebooting, my JDev 10.1.3.3 began to crash during its initialization, generating a JVM core dump in directory <JDEV_HOME>\jdev\bin.

After a quick look into the dump file, I noticed some problem with VFS, so I decided to disable VFS commenting the following line in file <JDEV_HOME>\jdev\bin\jdev.conf:

#AddVMOption -DVFS_ENABLE=true

Then, thank God, JDev came back to life again. So, don't panic.

Cheers!

Wednesday, April 16, 2008

Is there a cook in JDev's team?

This week I found something at least very curious when I launched my JDeveloper 10.1.3.3 as I do almost every morning. This was the "Tip of the Day" it showed me:


Well, I don't know what this means but, anyway, here is a full recipe, just in case: http://www.foodnetwork.com/food/recipes/recipe/0,1977,FOOD_9936_15602,00.html

:)

Monday, March 31, 2008

Using FindBugs in JDeveloper 10g

by Fábio Souza

FindBugs Logo
These days I've been looking for a good way to incorporate FindBugsTM within my JDeveloper 10g and I couldn't find anything about it on the net. I talked with Eduardo and we both thought it would be a good idea to configure FindBugs as a JDeveloper External Tool (and it is indeed).

Ok, before I start listing the steps to do it, I must say I'm pretty much aware of the fact that you will probably notice that I'm using Eduardo's JAXB 2.0 configuration steps listed on his previous post "JAXB 1.0 vs. 2.0 in JDeveloper 10g". Well... what can I say? I am a CTRL+C/CTRL+V addicted and I just can't help it! :D
  1. Click the menu item "Tools -> External Tools..."

  2. Press the "New..." button to start the "Create External Tool" wizard

  3. Select "External Program" as the "Tool Type" and press "Next"

  4. Fill the 3 displayed fields as follows:

    1. Program Executable:

      full path to the "java.exe" from your preferred JAVA_HOME (must be Java 5.0 or greater)

    2. Arguments:

      -Dfindbugs.home=. -Xmx256m -jar lib\findbugs.jar -sourcepath "${project.first.sourcepath}" -auxclasspath "${project.classpath}" -html -output "${project.dir}\${file.name.no.ext}.findbugs.html" "${project.outputdirectory}" "${project.outputdirectory}"

      The arguments above will be passed to "java.exe". Notice that we're bypassing "findbugs.bat" and executing the FindBugs JAR file directly. We must do this way because the batch file requires the classpath passed after "-auxclasspath" to be enclosed in double quotes (") and the macro "${project.classpath}" will match that requirement only when there's at least one path including one ore more blank spaces in its directories names.

    3. Run Directory:

      full path where FindBugs is installed.

  5. Press "Next" to advance to "Display" step and fill the 3 fields as you like. I suggest the following:

    1. Caption for Menu Items:

      FindBugs

    2. ToolTip Text:

      Run FindBugs on your project.

    3. Icon location:

      Download and configure this one -> FingBugs icon

    4. Press "Next" to advance to "Integration" step where I recommend selecting "Tools Menu" and "Navigator Context Menu"

    5. Press "Next" to advance to the final step "Availability". Here, you have to choose the option "When Specific File Types are Selected" and then move only the item "Java Project" from list "Available Types" to list "Selected Types"

    6. Press "Finish" and done!

Attention! I got an error while trying to use FindBugs in my JDeveloper 10.1.3.3. When "${project.classpath}" is expanded after "-auxclasspath", it includes the Java library paths as well. But, I don't know why, the default JDeveloper's Java SE library has i18n.jar, sunrasign.jar and the "classes" folder included in its classpath but these three items actually don't exist, so FindBugs will abort when it tries to locate them. I had to remove these items from my JDeveloper Java SE Library classpath to solve this problem.

Now it's all set to use FindBugs! Just right-click on a project in the Application Navigator and select "FindBugs". An HTML report will be generated in project's folder and standard output and error will be sent to JDev's Message View.

Enjoy your new tool!

Tuesday, January 22, 2008

My favorite JDeveloper extensions

by Eduardo Rodrigues

Hi everybody!

You must have noticed that JDeveloper may be boosted by a great number of extensions provided either by Oracle itself or by an open source and partners community. If you did not noticed that yet, then you certainly should do so. Even if it's just for curiosity, you may check a complete list of all extensions available selecting the menu item "Help -> Check for Updates...".

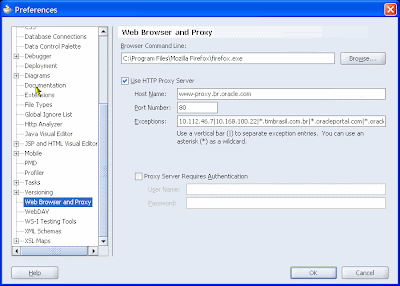
It's important to say that for this feature to work properly, your JDev's web proxy configuration must be correct. So it's worth to take a look at this first by selecting menu item "Tools -> Preferences...":

Web proxy configuration

Now that we're all set, let's go back to the "Help -> Check for Updates..." thing.

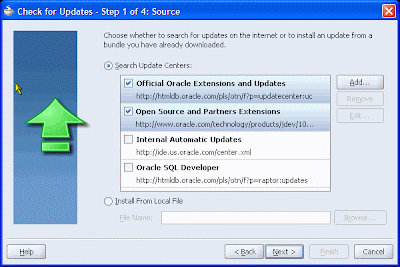
On the wizard's first step you should make the following selection:

JDeveloper Update Centers selection

After pressing "Next" you'll be presented to a list of available extensions from the update centers selected before. Browse the list and see how many interesting and useful stuff you can add to your JDeveloper environment. All you have to do is to select the extensions you like and proceed with the wizard. After restarting JDeveloper will automatically install all downloaded extensions. I recommend that you always restart JDeveloper immediately when prompted to.

An alternative way to browse and download these extensions outside JDeveloper is to visit the following URLs:

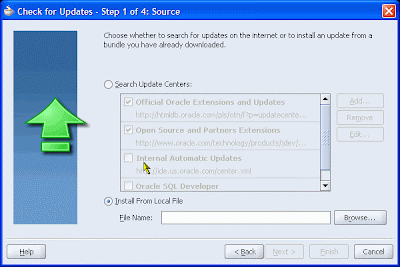
In this case, to install them, use the feature "Install From Local File" in "Help -> Check for Updates..." wizard:

Installing an update from local file

As a suggestion, here is a list of my favorite extensions:
  • MUST HAVE

    • Oracle ADF SRDemo Applications
      Great way to learn ADF by example. Comes in 2 flavors: EJB 3.0 + Toplink Essentials JPA or ADF BC

    • Oracle ADF Developer's Guides Update

    • JDeveloper Spring 2.5 Support
      Adds support for creating and editing Spring 2.5 bean defintions. This addin will create the Spring 2.5 library and register the relevant XSDs and DTDs with the IDE to provide a productive editing experience for Spring definitions

    • Struts Documentation 10.1.3
      Complete Javadoc for Struts

    • Variable Highlighter Extension
      Dynamically highlights variables as you click on them

    • Subversion VCS Extension
      Much better version controller than plain CVS

  • USEFUL

    • JUnit Integration Extensions
      Various extensions providing integrated support for JUnit

    • Oracle JHeadstart Evaluation Version
      Oracle JHeadstart is a productivity toolkit that works on top of Oracle ADF. Using ADF Faces as View, JSF as Controller and ADF Business Components as Business Service, JHeadstart generates sophisticated ADF web applications using simple metadata. Generated features include wizards, shuttles, trees, list of values, multi-row insert/update/delete, advanced and quick search capabilities, file upload/download, deeplinking, conditionally dependent items, dynamic breadcrumbs and more.

    • Copy As HTML
      Great extension that makes the task of copying bits of source code to blogs much easier

    • XPath Search Extension
      Best way to search inside XML documents

    • Make Read-only Files Writable

    • GWT Developer
      Provides visual editing environment to help with developing with the Google Web Toolkit (GWT)

    • PMD JDeveloper Extension
      Provides integrated support for PMD 4.1

    • Remove Workspaces and Projects
      Adds a context menu option that allows the deletion of projects and workspaces and of their sub-contents, quick and easy.

    • Additional Skins for ADF Faces

    • Zipper
      This extension provides a simple ZIP feature for applications and projects

On the other hand, the extension "JDeveloper Keep Resident (for Windows only)" is definitely one that you should NOT use. That's an experimental extension, works only on Windows and the very same effect may be achieved in a much better way which has already been explained in a previous post.

Finally, if you want to contribute with your own great JDeveloper extension, you may install "JDeveloper Extensions SDK" which is an extension itself and includes documentation and sample extensions.

That's all for now.

Cheers and... keep reading!

Tuesday, January 8, 2008

JAXB 1.0 vs. 2.0 in JDeveloper 10g

by Eduardo Rodrigues

Ok, I know JDeveloper 10g already comes with an embedded JAXB compiler which can be found in menu "Tools -> JAXB Compilation...". The only problem with this compiler is that it's a JAXB 1.0 implementation and, believe me, the differences are simply HUGE when compared to it's successor, JAXB 2.0. And all for the very best. To prove my point, let's go through a simple example comparing both JAXB versions.

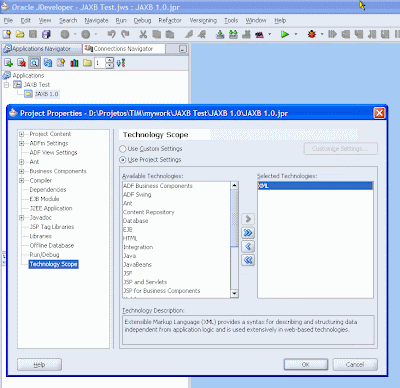
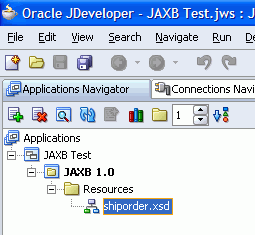
First of all, let's create a new application in JDeveloper with one empty project called "JAXB 1.0" adding only "XML" to its technology scope:

Click to enlarge

We must have a valid DTD or XML Schema so the JAXB compiler can work. Let's consider this small and simple XML Schema borrowed from a W3C tutorial:

<?xml version="1.0" encoding="ISO-8859-1" ?>
<xs:schema xmlns:xs="http://www.w3.org/2001/XMLSchema">

<!-- definition of simple elements -->
<xs:element name="orderperson" type="xs:string"/>
<xs:element name="name" type="xs:string"/>
<xs:element name="address" type="xs:string"/>
<xs:element name="city" type="xs:string"/>
<xs:element name="country" type="xs:string"/>
<xs:element name="title" type="xs:string"/>
<xs:element name="note" type="xs:string"/>
<xs:element name="quantity" type="xs:positiveInteger"/>
<xs:element name="price" type="xs:decimal"/>

<!-- definition of attributes -->
<xs:attribute name="orderid" type="xs:string"/>

<!-- definition of complex elements -->
<xs:element name="shipto">
 <xs:complexType>
  <xs:sequence>
   <xs:element ref="name"/>
   <xs:element ref="address"/>
   <xs:element ref="city"/>
   <xs:element ref="country"/>
  </xs:sequence>
 </xs:complexType>
</xs:element>
<xs:element name="item">
 <xs:complexType>
  <xs:sequence>
   <xs:element ref="title"/>
   <xs:element ref="note" minOccurs="0"/>
   <xs:element ref="quantity"/>
   <xs:element ref="price"/>
  </xs:sequence>
 </xs:complexType>
</xs:element>

<xs:element name="shiporder">
 <xs:complexType>
  <xs:sequence>
   <xs:element ref="orderperson"/>
   <xs:element ref="shipto"/>
   <xs:element ref="item" maxOccurs="unbounded"/>
  </xs:sequence>
  <xs:attribute ref="orderid" use="required"/>
 </xs:complexType>
</xs:element>
</xs:schema>


Just copy the code above to a file named "shiporder.xsd" in the project's root directory so it will automatically show in project's "Resources" folder:

Click to enlarge

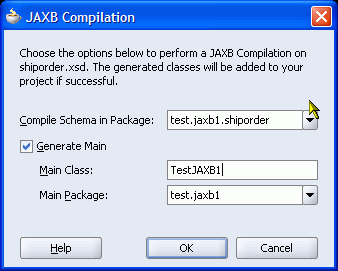
Now select file "shiporder.xsd" in the application navigator, click the menu item "Tools -> JAXB Compilation..." and fill up the pop-up shown as the screenshot bellow:

Click to enlarge

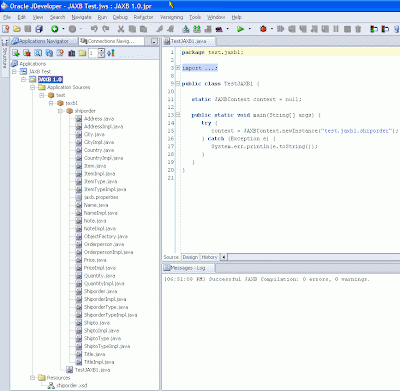
After pressing the "OK" button, you should see the following scenario:

Click to enlarge

As you can see, the JAXB compiler generates a bunch of classes and interfaces reflecting the structure defined by the compiled XML Schema. If you look closer, you'll notice that some of the classes extend "oracle.xml.jaxb.JaxbNode" (like class ShiporderTypeImpl, for instance). That's because the built-in JAXB compilation feature we just showed relies on a JAXB 1.0 proprietary implementation provided by Oracle in its XML Developer Kit which comes with JDeveloper. You may get more details on this at Oracle XDK Home site.

Continuing with our test case, let's create a sample "testorder.xml" based on our shiporder.xsd schema:

<?xml version="1.0" encoding="ISO-8859-1" ?>
<shiporder orderid="0001" xmlns:xsi="http://www.w3.org/2001/XMLSchema-instance"
           xsi:noNamespaceSchemaLocation="shiporder.xsd">
  <orderperson>Eduardo Rodrigues</orderperson>
  <shipto>
    <name>John Doe</name>
    <address>#100, Oracle Parkway</address>
    <city>Redwood City</city>
    <country>USA</country>
  </shipto>
  <item>
    <title>DVD+RW</title>
    <quantity>50</quantity>
    <price>.50</price>
  </item>
  <item>
    <title>17&quot; LCD Monitor</title>
    <quantity>5</quantity>
    <price>150.00</price>
  </item>
  <item>
    <title>Bluetooth Mouse</title>
    <quantity>10</quantity>
    <price>40.00</price>
  </item>
</shiporder>


To read in and process this sample XML using the package generated by Oracle's JAXB compiler, we must use the JAXB feature called "Unmarshal". To do that, I'll modify class test.jaxb1.TestJAXB1 like this:

package test.jaxb1;

import java.io.File;
import java.util.List;
import javax.xml.bind.JAXBContext;
import javax.xml.bind.JAXBException;
import javax.xml.bind.Marshaller;
import javax.xml.bind.Unmarshaller;
import test.jaxb1.shiporder.*;

public class TestJAXB1 {

   static JAXBContext context = null;

   public static void main(String[] args) {
      try {
         context = JAXBContext.newInstance("test.jaxb1.shiporder");
         Unmarshaller unmarshaller = context.createUnmarshaller();
         Shiporder order = (Shiporder)unmarshaller.unmarshal(new File("testorder.xml"));
         System.out.println("Items included in order #"+order.getOrderid()+" are:");
         
         for (ItemTypeImpl item : (List<ItemTypeImpl>)order.getItem()) {
            System.out.println("\t:. "+item.getTitle()+" - "+
               item.getQuantity()+" item(s) at $"+item.getPrice()+" each");
         }
      } catch (Exception e) {
         e.printStackTrace();
      }
   }
}


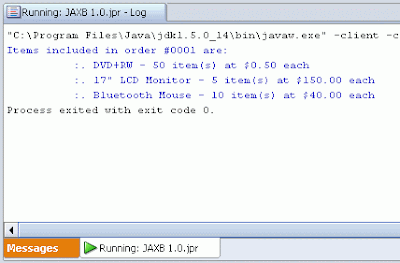
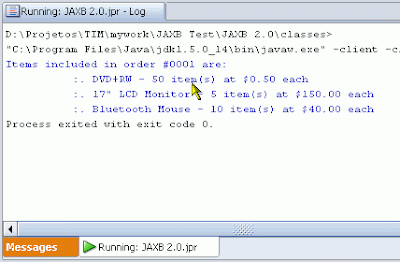
Making a long story short, the "magic" performed by the Unmarshaller is basically to parse the XML using the classes generated by the JAXB compiler to map its entire content into memory. It's just like using a DOM parser to load the XML's DOM tree into memory. The advantage here is that the names, attributes and methods in JAXB generated objects strictly reflect the XML's structure defined by its schema making it much easier and more intuitive to work with them instead of a pure DOM tree. Running the test above, the outcome should be:

Click to enlarge

Quite easy. You'd probably think: Well... I'm ok with that. It's easy enough already. The question is: is that so??? NOT!!!

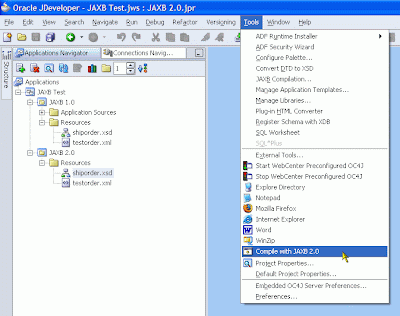
Now I will repeat the same test case described above only upgrading from JAXB 1.0 to JAXB 2.0. First, we'll need to get a working implementation of JAXB 2.0. I recommend Sun's reference implementation which can be downloaded here (at the time I was writing this post, version 2.1.6 was the latest one). Just follow the instructions in that page to install it correctly and notice the bin subdirectory containing some scripts, including "xjc.bat" (for Windows; "xjc.sh" for Unix). This is the script supplied to execute JAXB 2.0 compilation. The trick here is to embed it in JDeveloper as an "External Tool". I'll show you how to do that step-by-step:

  1. Click the menu item "Tools -> External Tools..."

  2. Press the "New..." button to start the "Create External Tool" wizard

  3. Select "External Program" as the "Tool Type" and press "Next"

  4. Fill the 3 displayed fields as follows:

    • Program Executable:
      full path to the script "xjc.bat" which sould be <Sun_JAXB_2.1.6_install_dir>/bin/xjc.bat (or "xjc.sh" on Unix)

    • Arguments:
      -d "${project.first.sourcepath}" -p ${promptl:label=Target Package Name} "${file.path}".

      Press button "Insert..." to see all macros available (i.e.: ${file.path}).

      The arguments above will be passed to the script "xjc.bat". Execute it with no arguments in a command prompt to see a help on all possible arguments. The default is to compile a XML Schema but you can use -dtd to compile a DTD instead, although it's an experimental feature.

    • Run Directory:
      <Sun_JAXB_2.1.6_install_dir>/bin


  5. Press "Next" to advance to "Display" step and fill the 3 fields as you like. I suggest the following:

    • Caption for Menu Items:
      Compile XML Schema with JAXB 2.0

    • ToolTip Text:
      Compile a XML Schema with JAXB 2.0 Reference Implementation by Sun Microsystems

    • ToolTip Text:
      ide.fileicon:<SUN_JAXB_2.1.6_install_dir>/bin/xjc.bat


  6. Press "Next" to advance to "Integration" step where I recommend selecting "Tools Menu" and "Navigator Context Menu"

  7. Press "Next" to advance to the final step "Availability". Here, I recommend choosing the option "When Specific File Types are Selected" and then move only the item "XML Schema Type" from list "Available Types" to list "Selected Types"

  8. Press "Finish" and done!
Now we have the same built-in "JAXB Compilation" functionality described before but now using Sun's JAXB 2.1.6. So, let's repeat the same test case using our new tool.

First, create a new empty project called "JAXB 2.0" also adding only "XML" to its technology scope.

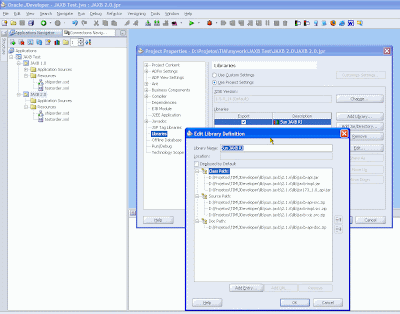
We'll need to create a JAXB 2.0 library and add it to the project:

Click to enlarge

The important here is to add the following archives, located in directory <Sun_JAXB_2.0_install_dir>/lib, to the library's class path: jaxb-api.jar, jaxb-impl.jar and jsr173_1.0_api.jar.

Now just copy files "shiporder.xsd" and "testorder.xml" from project "JAXB 1.0" to this new project's root directory. Also be sure that the sources directory configured for the project exists and, if it doesn't, create it manually. That's needed because Sun's JAXB 2.1.6 compiler won't create its output directory automatically and the process will fail if that directory doesn't exist. Finally, select file "shiporder.xsd" in the Applications Navigator and execute our newly created menu item "Tools -> Compile XML Schema with JAXB 2.0"

Click to enlarge

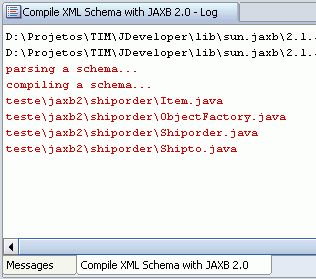
Define "test.jaxb2.shiporder" as the "Target Package Name" when prompted. After execution, you should see the following output:

Click to enlarge

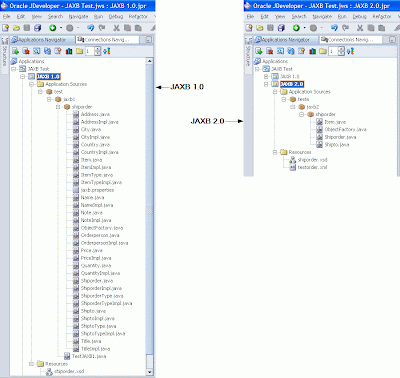
Just click the "Refresh" button on the Applications Navigator and the new package "test.jaxb2.shiporder" will appear. At this point we can already make a simple comparison:

Click to enlarge

As you can see, instead of generating 16 interfaces, 15 classes and 1 property file, JAXB 2.0 generated only 4 classes! And like it was not enough, if you look inside those 4 classes you'll notice that they are all very simple POJOs!!!

Take class "Shiporder.java" for example:

//
// This file was generated by the JavaTM Architecture for XML Binding(JAXB) Reference Implementation, v2.1.5-b01-fcs 
// See <a href="http://java.sun.com/xml/jaxb">http://java.sun.com/xml/jaxb</a> 
// Any modifications to this file will be lost upon recompilation of the source schema. 
// Generated on: 2008.01.09 at 12:41:26 PM BRST 
//

package test.jaxb2.shiporder;

import java.util.ArrayList;
import java.util.List;
import javax.xml.bind.annotation.XmlAccessType;
import javax.xml.bind.annotation.XmlAccessorType;
import javax.xml.bind.annotation.XmlAttribute;
import javax.xml.bind.annotation.XmlElement;
import javax.xml.bind.annotation.XmlRootElement;
import javax.xml.bind.annotation.XmlType;


/**
 * <p>Java class for anonymous complex type.
 * 
 * <p>The following schema fragment specifies the expected content contained within this class.
 * 
 * <pre>
 * &lt;complexType>
 *   &lt;complexContent>
 *     &lt;restriction base="{http://www.w3.org/2001/XMLSchema}anyType">
 *       &lt;sequence>
 *         &lt;element ref="{}orderperson"/>
 *         &lt;element ref="{}shipto"/>
 *         &lt;element ref="{}item" maxOccurs="unbounded"/>
 *       &lt;/sequence>
 *       &lt;attribute ref="{}orderid use="required""/>
 *     &lt;/restriction>
 *   &lt;/complexContent>
 * &lt;/complexType>
 * </pre>
 * 
 * 
 */
@XmlAccessorType(XmlAccessType.FIELD)
@XmlType(name = "", propOrder = {
    "orderperson",
    "shipto",
    "item"
})
@XmlRootElement(name = "shiporder")
public class Shiporder {

    @XmlElement(required = true)
    protected String orderperson;
    @XmlElement(required = true)
    protected Shipto shipto;
    @XmlElement(required = true)
    protected List<Item> item;
    @XmlAttribute(required = true)
    protected String orderid;

    /**
     * Gets the value of the orderperson property.
     * 
     * @return
     *     possible object is
     *     {@link String }
     *     
     */
    public String getOrderperson() {
        return orderperson;
    }

    /**
     * Sets the value of the orderperson property.
     * 
     * @param value
     *     allowed object is
     *     {@link String }
     *     
     */
    public void setOrderperson(String value) {
        this.orderperson = value;
    }

    /**
     * Gets the value of the shipto property.
     * 
     * @return
     *     possible object is
     *     {@link Shipto }
     *     
     */
    public Shipto getShipto() {
        return shipto;
    }

    /**
     * Sets the value of the shipto property.
     * 
     * @param value
     *     allowed object is
     *     {@link Shipto }
     *     
     */
    public void setShipto(Shipto value) {
        this.shipto = value;
    }

    /**
     * Gets the value of the item property.
     * 
     * <p>
     * This accessor method returns a reference to the live list,
     * not a snapshot. Therefore any modification you make to the
     * returned list will be present inside the JAXB object.
     * This is why there is not a <CODE>set</CODE> method for the item property.
     * 
     * <p>
     * For example, to add a new item, do as follows:
     * <pre>
     *    getItem().add(newItem);
     * </pre>
     * 
     * 
     * <p>
     * Objects of the following type(s) are allowed in the list
     * {@link Item }
     * 
     * 
     */
    public List<Item> getItem() {
        if (item == null) {
            item = new ArrayList<Item>();
        }
        return this.item;
    }

    /**
     * Gets the value of the orderid property.
     * 
     * @return
     *     possible object is
     *     {@link String }
     *     
     */
    public String getOrderid() {
        return orderid;
    }

    /**
     * Sets the value of the orderid property.
     * 
     * @param value
     *     allowed object is
     *     {@link String }
     *     
     */
    public void setOrderid(String value) {
        this.orderid = value;
    }
}


"public class Shiporder {". No interfaces being implemented, no classes being extended at all. Only a simple JavaBean with its attributes and their respective accessors. The "magic" here is done thanks to the annotations. They perform the actual mapping between the XML's structure defined by the compiled XML Schema and the classes derived from that compilation process.

I think it's pretty obvious to see the huge advantages of JAXB 2.0 when compared to version 1.0. The compilation of a XML Schema produces much fewer classes and those classes are simply annotated POJOs. This certainly implies a much faster, lighter and easier to understand XML binding.

Besides, there are some other details that makes JAXB 2.0 even more beneficial. Javadocs are automatically generated, it relies on cutting-edge XML parsing technology called "Streaming API for XML" which basically gives much more precise control over XML document processing. For further info on this, read "Oracle StAX Pull Parser Preview" and "JSR#173 homepage". Finally, as opposed to the known limitations of JDeveloper's built-in JAXB 1.0 compiler, Sun's JAXB 2.1.6 supports:

  • Javadoc generation

  • The key and keyref features of XML Schema

  • The List and Union features of XML Schema

  • SimpleType mapping to TypeSafe Enum class and IsSet property modifier

  • XML Schema component "any" and substitution groups

  • Customization of XML Schema to override the default binding of XML Schema components

  • On-demand validation of content based on a given Schema

To run the same unmarshalling test, just create class "test.jaxb2.TestJAXB2" as follows:

package test.jaxb2;

import java.io.File;
import javax.xml.bind.JAXBContext;
import javax.xml.bind.Unmarshaller;
import test.jaxb2.shiporder.Item;
import test.jaxb2.shiporder.Shiporder;

public class TestJAXB2 {

   public static void main(String[] args) {
      try {
         JAXBContext context = JAXBContext.newInstance("test.jaxb2.shiporder");
         Unmarshaller unmarshaller = context.createUnmarshaller();
         Shiporder order = (Shiporder)unmarshaller.unmarshal(new File("testorder.xml"));
         System.out.println("Items included in order #"+order.getOrderid()+" are:");
         
         for (Item item : order.getItem()) {
            System.out.println("\t:. "+item.getTitle()+" - "+
               item.getQuantity()+" item(s) at $"+item.getPrice()+" each");
         }
      } catch (Exception e) {
         e.printStackTrace();
      }
   }
}


This is slightly different from class "test.jaxb1.TestJAXB1" but, after running it, you should see exactly the same outcome:

Click to enlarge

Well, that's it. I think I've made my point. So good luck in your JAXB 2.0 adventures!

Friday, August 3, 2007

Mastering ADF Faces <af:selectOneChoice> component

I've being trying to solve this issue for a long time. I've read many blogs, forums and articles about it but, none was a complete solution. Fortunately, now that I've finally managed to put it all together I decided to share with you all.

The problem is very simple and, as far as I noticed, very common also. I want to build a combo box based on a result set from my database within an ADF Faces page. Ok, I know, I should use the selectOneChoice component bound to my database through a PageDefinition XML. What if I also need to bind a specific attribute from my result set to the value attribute of each item in the selectOneChoice component? Well, believe me... it's not as easy as it may seem.

By definition, when a bound selectItems tag is used with the seleceOneChoice component, ADF will render each item like this:

<option value="N">bound resultset attribute as the option label</option>

"N" being a natural number varying from 0 (zero) to the total number of rows in the result set minus 1. In other words, an item's value will always be the index of it's corresponding row in the bound iterator's collection, no matter what. The problem is that, many times, it's really important to have more meaningful information as the item's value, specially when we need to make some client-side processing based on it. The question is: how? Well, here is the complete answer with very simple example.

Suppose we've defined a list binding identified by "myList" bound to an iterator for a collection of objects of the following bean class:

public final class ListItemBean {

   private String itemValue;
   private String itemLabel;

   public ListItemBean() {}

   public void setItemValue(String value) {
      this.itemValue = value;
   }

   public void setItemLabel(String label) {
      this.itemLabel = label;
   }

   public String getItemValue() {
      return this.itemValue;
   }

   public String getItemLabel() {
      return this.itemLabel;
   }
}


The most common use case of <af:seleconechoice> would be:

<af:selectonechoice id="myCombo" value="#{bindings.myList.inputValue}">
   <f:selectitems value="#{bindings.myList.items}"/>
</f:selectitems>


The label of each will be rendered according to myList definition in the PageDefinition XML file. So, if I want to use the bean attribute itemLabel, myList definition should be something like this:

<list listopermode="1" iterbinding="myListIterator" id="myList">
   <attrnames>
      <item value="itemLabel">
   </item>
</attrnames>


Now, if I want to take control of how each will be rendered:

<af:selectonechoice id="myCombo" valuepassthru="true" value="#{bindings.myList.inputValue}">
   <af:foreach items="#{bindings.myList.iteratorBinding.allRowsInRange}" var="row">
      <af:selectItem id="myItem"
         value="#{row.dataProvider.itemValue}"
         label="#{row.dataProvider.itemLabel}"/>
   </af:forEach>
</af:selectOneChoice>


It is very important to define an id for af:selectitem. If you don't, ADF runtime won't render the page correctly. Also notice the valuePassThru attribute defined to "true". It tells ADF to render each selectItem like this: <option value="the item's real value goes here">the item's label goes he</option>. That's important exactly because I need to make client-side processing using items real values. Without valuePassThru="true", the options values would continue to be rendered as corresponding indexes. Before you ask, know that simply adding valuePassThru="true" to the common use case above won't work since ADF ignores it if you aren't using af:selectItem.

Well, that should be all, but it isn't. There's one side effect which is a potentially unwanted empty element as your combo box's first option. That's because now, ADF doesn't have a default value for your combo box when it's first rendered. There are many different ways of solving this minor issue but, in my opinion, the easiest would be to add the following JavaScript to the page:

<script type="text/javascript">

function removeEmptyOption() {
   if (document.forms[0].myCombo.options[0].value=='') {
      document.forms[0].myCombo.options[0] = null;
      document.forms[0].myCombo.value = document.forms[0].myCombo.options[0].value;
   }
}

</script>


Now, just call it from the page body's onLoad event: <afh:body onload="removeEmptyOption()">

If you prefer, you may also use CSS to do the job (which I think is far more elegant). Just add the following style to the page:

<style type="text/css" media="screen">
   option[value=""] {
      display: none;
   }
</style>


The problem with this solution is that CSS Selectors are not compatible with all browsers, specially with IE6 : (

So, that's it. I hope you enjoy.

Wednesday, June 6, 2007

JDeveloper Tips #2: Fine-tuning the configuration

by Eduardo Rodrigues
Yet another great tip - this one is specially directed to those using JDeveloper on Windows.

It may seem strange but the amount of programmers aware of the possibility of customizing JDev's initialization settings isn't so big as you may expect. Many don't even know about the existence of a configuration file. Well, there is a configuration file and it's located at %JDEV_HOME%\jdev\bin\jdev.conf (%JDEV_HOME% being the directory where you've installed JDeveloper). If you open this file you'll see a great number of options, properties, etc. The guys at Oracle did their job and commented on every one, so it won't be difficult to figure out their purpose.

Having said that, I'd like to share with you some lessons learned through my own experience that have certainly made my work with JDeveloper much smoother:

#
# This is optional but it's always
# interesting to keep your JDK up to date
# as long you stay in version 1.5
#
SetJavaHome C:\Program Files\Java\jdk1.5.0_12

#
# Always a good idea to set your User Home
# appropriately. To do so, you must
# configure an environment variable in
# the operating system and set its value
# with the desired path
# (i.e. JDEV_USER_HOME=D:\myWork\myJDevProjs).
# Then you must set the option bellow with
# the variable's name.
#
# You'll notice that when you change
# the user home directory, JDev will ask
# you if you want to migrate from a
# previous version. That's because it
# expects to find a "system" subdirectory.
# If you don't wanna loose all your config
# I recommend that you copy the "system"
# folder from its previous location
# (%JDEV_HOME%\jdev\system is the default) to
# your new JDEV_USER_HOME before restarting
# JDev.
#
SetUserHomeVariable JDEV_USER_HOME

#
# Set VFS_ENABLE to true if your
# projects contain a large number of files.
# You should use this specially if
# you're using a versioning system.
#
AddVMOption -DVFS_ENABLE=true

#
# Try to make JDev always fit in your available
# physical memory.
# I really don't recommend setting the maximum
# heap size to less than 512M but sometimes it's
# better doing this than having to get along with
# unpleasant Windows memory swapping.
#
# Just a reminder: this option does not establish
# an upper limit for the total memory allocated
# by the JVM. It limits only the heap area.
#
AddVMOption -Xmx512M

#
# Use these options bellow ONLY IF you're
# running JDeveloper on a multi-processor or
# multi-core machine.
#
# These options are designed to optimize the pause
# time for the hotspot VM.
# These options are ignored by ojvm with an
# information message.
#
AddVMOption -XX:+UseConcMarkSweepGC
AddVMOption -XX:+UseParNewGC
AddVMOption -XX:+CMSIncrementalMode
AddVMOption -XX:+CMSIncrementalPacing
AddVMOption -XX:CMSIncrementalDutyCycleMin=0
AddVMOption -XX:CMSIncrementalDutyCycle=10

#
# On a multi-processor or multi-core machine you
# may uncomment this option in order to
# limit CPU consumption by Oracle JVM client.
#
# AddVMOption -Xsinglecpu

#
# This option isn't really documented but
# it's really cool!
# Use this to prevent Windows from paging JDev's memory
# when you minimize it.
# This option should have the same effect as
# the KeepResident plug-in with the advantage
# of being a built-in feature in Sun's JVM 5.
#
AddVMOption -Dsun.awt.keepWorkingSetOnMinimize=true

Tuesday, June 5, 2007

JDeveloper Tips #1: Managing your libraries

by Felippe Oliveira
Hi folks! This post is directed to Oracle JDeveloper users and was originally written by Felippe Oliveira who is a consultant for Oracle Brazil.

Do you have a hard time tying to figure out the best way of configuring your projects' libraries so they're truly portable? Well, the lack of an easy-to-use "environment variables" setting mechanism (like the one we may find in Eclipse) can make it even harder. So here's a userful suggestion to address this issue.

Basically, the JDeveloper workspace consists of applications that are composed of projects which, in fact, contain packages, classes, resources and other files. This structure is normally reflected in the filesystem.

Let's say you're working on 2 ADF applications and your local work directory is c:\mywork. The directory structure should look like this:

Figure 1

The question is: where should you place your custom and/or external libraries? The best answer is as follows:

Step 1: create a child subdirectory of c:\mywork and put them all there, like this:

Figure 2

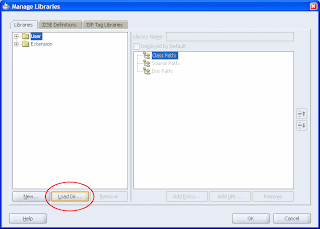
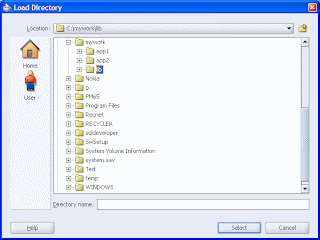
Step 2: back to your JDev, select "Tools -> Manage Libraries..." in the menu and click the "Load Dir..." button and select the lib directory created before.

Figure 3


Figure 4

Note that a new "lib" folder will appear in the "Libraries" tab.

Step 3: Click the "New..." button to create each of your new libraries, referencing the corresponding JAR or ZIP files in the c:\mywork\lib directory:

Figure 5

The main advantage of doing this relies in that JDev puts one file with a ".library" extension in c:\mywork\lib for each of the libraries you've created. Plus, all paths referenced in those files will be relative to c:\mywork. Now, if you need to recreate the whole workspace in another JDev installation, all you have to do is copy c:\mywork to any other location in the destination machine and repeat step 2. This time you'll notice that all libraries will be automatically listed under the "lib" folder in the "Libraries" tab and that's it. Your libraries are ready to go!

Another interesting advantage to consider is that this structure is ideal for versioning systems. Just import the entire structure under c:\mywork into the repository. Whoever checks out the same structure won't have to reconfigure all projects' libraries nor adjust them to their local directories.

That's all for now. Thanks again to Felippe. Good stuff!